Ich freue mich wahnsinnig, dass die Karte die ich für den zweiten Stamp ’N Hop Blog Hop gewerkelt hatte so gut gefallen hat, dass ich nach einer Anleitung gefragt wurde! Also habe ich versucht, eine Schritt-für-Schritt-Beschreibung zu erstellen. Wenn etwas unklar ist oder Du Fragen hast bitte einfach melden, damit ich die Beschreibung entsprechend ergänzen / korrigieren kann. Das ist allerdings meine erste Anleitung die ich in dieser Art erstelle, also bitte ich um etwas Nachsicht…
Die verwendeten Produkte sind im Originalbeitrag und hier nochmal unterhalb der Beschreibung gelistet, daher lege ich direkt los. Du kannst die Bilder anklicken um sie größer anzusehen.
I’m feeling ridiculously giddy that I was asked to create a tutorial for the card I created for the second Stamp ’N Hop Blog Hop! Seriously, I’m happy that you liked it so much, and tried to put together a step by step description. If anything is not clear for you or if you have questions please just let me know so I can add / correct details to make it more understandable. It’s my first tutorial though, so please be gentle! Also, as I’m not a native speaker I really appreciate any corrections that you might have for my English. I’d like you to be able to follow the steps without scratching your head and puzzling over whatever the crazy German is rambling on about!
The products are listed in the original blog entry here as well as below the description, so I’ll jump right in. Click on the pictures to get a bigger view of them.
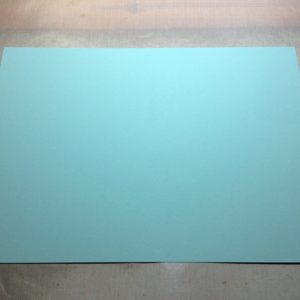
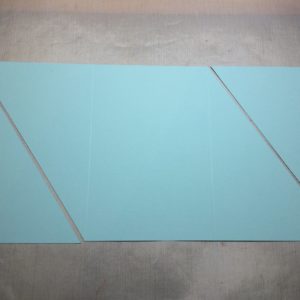
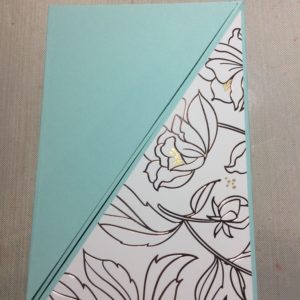
1) Du brauchst ein Stück Aquamarin Farbkarton in der Größe 14,8 x 29,7 cm. Wenn Du mit einer anderen Papiergröße als A4 arbeitest, schneide einen Bogen Farbkarton längs auf die Höhe der üblichen Kartengröße zu. Alle anderen Maße wirst Du entsprechend anpassen müssen wie es dann auf Deine Kartengröße passt.
1) Trim a piece of Pool Party card stock to 14,8 x 29,7 cm. If you work with other paper formats than A4, cut your full sheet of card stock lengthwise to the heigth of your usual card base and keep the full length. You will need to adjust all other measurements to fit your card size.
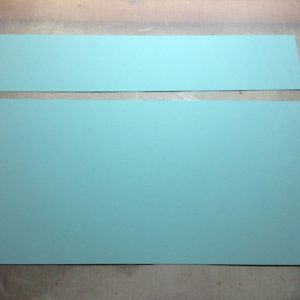
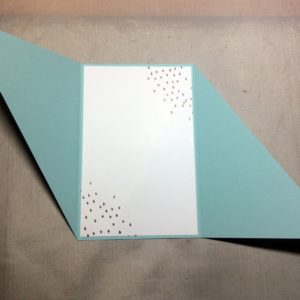
2) Falze den Farbkarton so, dass er gedrittelt wird. In meinem Fall ziehe ich die Falzlinie bei einer Winzigkeit weniger als 9,9 cm an beiden Seiten. Wenn die äußeren Drittel eine Kleinigkeit kürzer sind überschneiden sich die schrägen Seiten später nicht.
2) Score your card base in 3 pieces, in my case I’m scoring at a tiny smidge less than 9,9 cm from both sides. Basically you want to have thirds, but if the outer panels are a tiny bit smaller it will avoid an overlap of the diagonal parts.
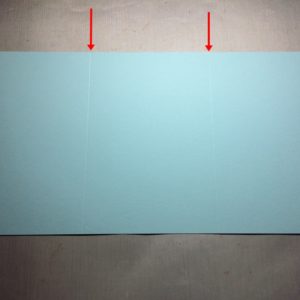
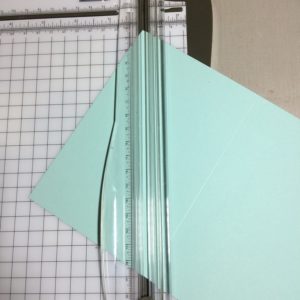
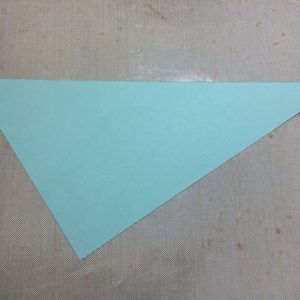
3) Schneide die beiden äußeren Drittel diagonal an. Achte dabei darauf, dass beide Schrägen in die gleiche Richtung gehen!
3) Cut the two outer panels diagonally, taking care to have both cuts go in the same direction.
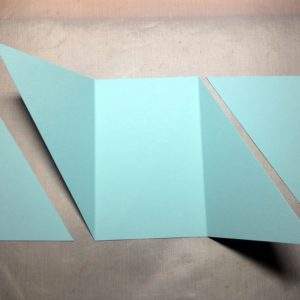
4) Jetzt kannst Du die Falzlinien nachziehen und damit die diagonalen Teile nach innen falten. Prüfe ob sie sich überschneiden und schneide wenn nötig die Kante etwas nach, damit die Karte sich sauber schließt.
4) Fold the diagonal parts inwards. If they overlap, trim off a bit of the diagonal edge so the card closes neatly.
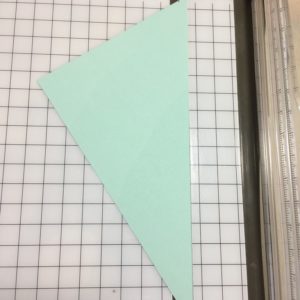
5) Schneide ein Stück Designerpapier Frühlingsglanz auf 9,2 x 14 cm zu und halbiere es schräg. Das wird die Lage für die rechte Klappe. Prüfe ob es mit einem schön gleichmäßigen Rand auf die Klappe passt oder ob Du etwas nachschneiden musst (weil z.B. die Klappe etwas korrigiert wurde). Dann nimm eines der abgeschnittenen Dreiecke vom Aquamarin Farbkarton und schneide es auf die gleiche Größe zu wie das Designerpapier. Ich lege dafür einfach den Farbkarton auf das Designerpapier und markiere mit einem Bleistift, bis wohin das Designerpapier reicht. Dann lege ich den Farbkarton so in den Trimmer, dass die Markierungen in der Schneidrinne liegen und schneide den Überstand ab. Beide Dreiecke sollten jetzt auf die Klappen passen. Das Designerpapier kannst Du mit dem Klebemittel Deiner Wahl festkleben, den Farbkarton noch nicht!
5) Cut a piece of the Springtime Foils Specialty Designer Series Paper to 9,2 x 14 cm and cut it in half diagonally. This will be the layer for the right front panel. Make sure it fits the panel with a nice even border and trim any excess if necessary (e.g. because the panel needed adjustment for the card to close properly). Then take one of the cut off pieces of Pool Party card stock and trim it to the same size as the DSP, this will be the layer for the left front panel. I simply lay the cardstock on top of the DSP and mark with a pencil where the DSP ends, then I put the piece down on the Paper Trimmer so the marks are in the cutting groove and cut off the excess. Both triangles should fit the front panels now. You can use the adhesive of your choice to glue down the DSP, but do not glue down the cardstock yet!
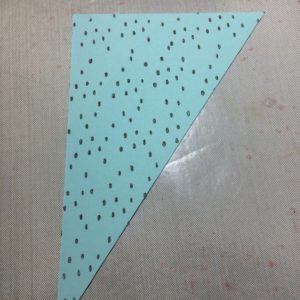
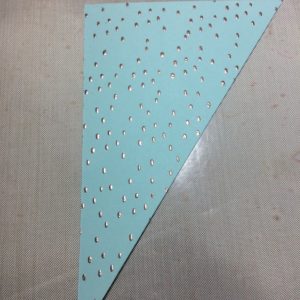
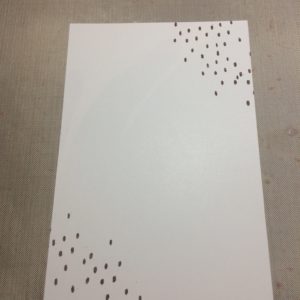
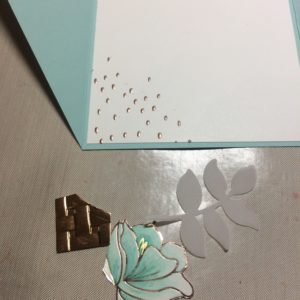
6) Das Farbkarton-Dreieck habe ich nun noch mit den länglichen Pünktchen aus dem Sale-A-Bration-Set Vielseitige Grüße in VersaMark bestempelt und mit dem Kupfer-Pulver embosst.
6) Now I stamped the longer points from the Sale-A-Bration set Eclectic Expressions with VersaMark and embossed them with the copper embossing powder.
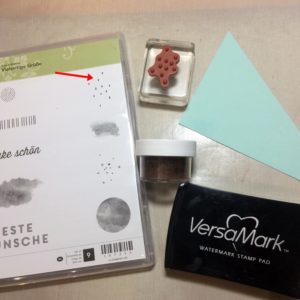
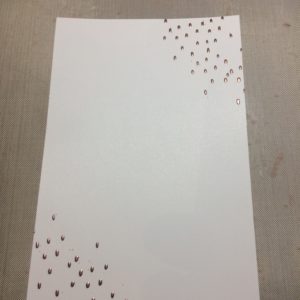
7) Und da ich das Pulver gerade draußen hatte, habe ich für die Innenseite gleich noch die Ecken eines Stücks Flüsterweiß (9,3 x 14,3 cm) ebenfalls bepunktet. Vergesst nicht – wie ich, offensichtlich – vorher mit dem Embossing Buddy drüberzugehen! Die Lage kannst Du innen schon mal einkleben.
7) As I had the embossing powder out, I used it on a piece of Whisper White card stock measuring 9,3 x 14,3 cm for the inside as well. Don’t forget to use your Embossing Buddy as I obviously did! You can go ahead and glue down the layer to the inside.
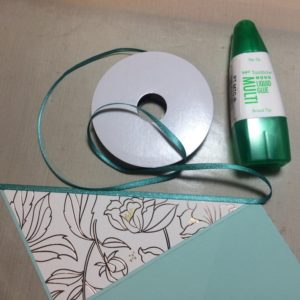
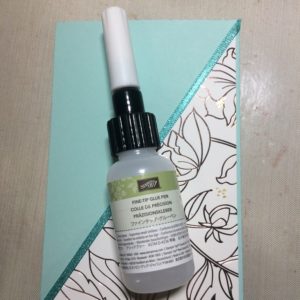
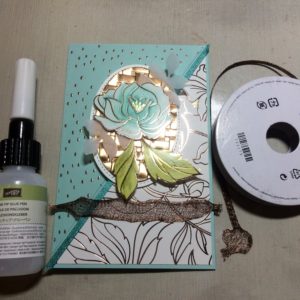
8) Mit dem dünnsten Band aus dem Sale-A-Bration Kombipack mit dem schimmernden Geschenkband habe ich die Kante der Klappe mit dem Designerpapier verziert. Zum Festkleben habe ich den Mehrzweck-Flüssigkleber benutzt und das überstehende Band dann abgeschnitten. Wer Sorge hat die Enden könnten ausfransen kann ein paar Tropfen Präzisionskleber darauf verstreichen. Der ist nach dem Trocknen klar und klebt nicht, hält aber die Fasern zusammen.
8) I glued down a bit of the thinnest ribbon out of the Sale-A-Bration Shimmer Ribbon Pack to the edge of the front flap with the DSP, using the Multipurpose Glue. If you worry about the edge of the ribbon fraying after cutting off the excess, you can apply a bit of the Fine Tip Glue to the end. It dries clear and non-sticky, but will keep the threads in place.
9) So, jetzt sammeln wir noch ein paar Einzelteile zusammen:
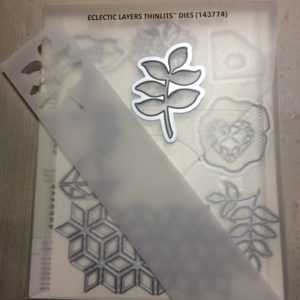
– 3x Blätter aus Pergament, ausgestanzt mit den Thinlits Kreative Vielfalt
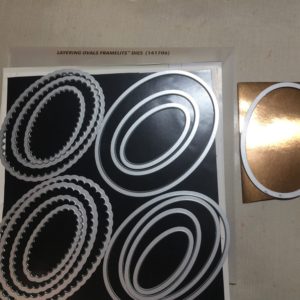
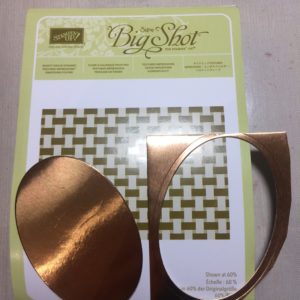
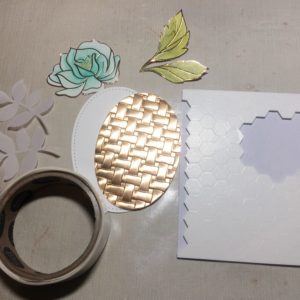
– 1x Oval aus Kupferfolie, ausgestanzt mit dem zweitgrößten Framelit aus Lagenweise Ovale
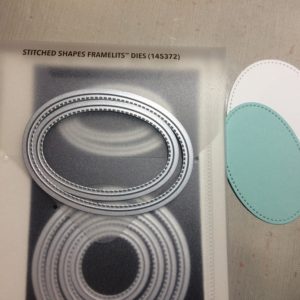
– 2x Oval aus Flüsterweiß, ausgestanzt mit dem größten aus den Framelits Stickmuster, und 1x Oval aus Aquamarin mit dem zweitgrößten Oval dieser Framelits
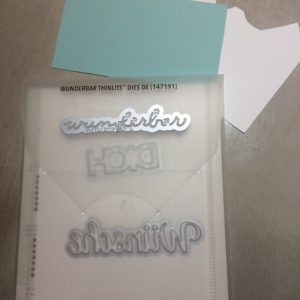
– das Wort „wunderbar“ je einmal in Aquamarin und Flüsterweiß, aus den Sale-A-Bration Thinlits Wunderbar
– zwei Blüten aus dem Designerpapier Frühlingsglanz. Eine habe ich direkt vom Rand ausgeschnitten, da sie innen in der Karte auch am Rand kleben wird ist es nicht schlimm, wenn ein Stückchen fehlt. Schön jeden Fetzen von dem tollen Papier nutzen!
9) Now we have to go ahead and get together a few parts:
– 3x Vellum leaves, cut with the Eclectic Layers Thinlits
– 1 oval cut from the Copper Foil, I used the second largest from the Layering Oval Framelits
– 2 ovals cut from Whisper White with the largest oval from the Stitched Shapes Framelits, and 1 oval cut from Pool Party card stock with the second largest oval
– one of the words of the Sale-A-Bration Celebrate You Thinlits, I think the „amazing“ would work well. You’ll need it twice, one in Pool Party and one in Whisper White
– two flowers cut out of the Springtime Foils Specialty Designer Series Paper. I cut one of them right from the edge of the paper; because of how it’s glued down to the inside of the card it doesn’t matter if a small piece is missing. Have to use every shred of this gorgeous paper!
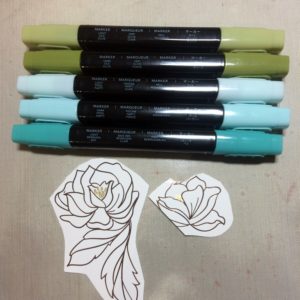
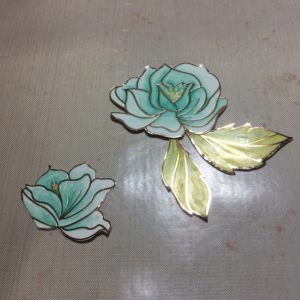
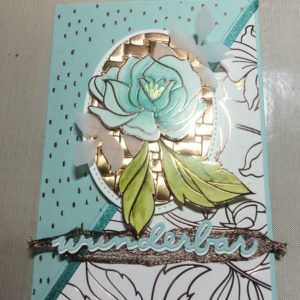
10) Male die Blüten mit den Blends aus und schneide sie dann aus. In diesem Fall habe ich sogar die Blätter abgeschnitten und nachträglich etwas anders wieder angeklebt, da sie mir für diese Karte anders platziert besser gefielen.
Das Kupfer-Oval und der übrig gebliebene Rest vom Ausstanzen wird jetzt mit der Prägeform Korbgeflecht aus der Sale-A-Bration durch die Big Shot gekurbelt. Das Kupfer klebst Du mit Dimensionals auf eines der Flüsterweiß-Ovale; die Pergament-Blätter kannst Du mit Klebepunkten hinten an der Blüte befestigen bevor diese ebenfalls mit Dimensionals auf dem Kupfer-Oval festgeklebt wird.
10) Use the Blends to colour the flowers and you will have to fuzzy cut them. In this case I even cut off the leaves and used a Glue Dot to adhere them back on in a slightly different position that I liked better for the purpose of this card.
The copper oval and the rest of the copper foil left over from cutting are now put into the Sale-A-Braiton Embossing Folder Basket Weave and cranked through the Big Shot. Glue the copper weave oval on one of the Whisper White ovals using Dimensionals. You can use Glue Dots to glue the Vellum leaves to the back of the flower before putting that on the copper with Dimensionals as well.
11) Jetzt noch schnell die Innenseite fertigmachen. Von dem Reststück Kupferfolie mit Prägung habe ich mir einen passenden Schnipsel aufgehoben, um ihn unter die Blüte kleben zu können. Das Pergament-Blatt wird wieder an die Blüte geklebt und die dann mit dem Kupfer-Stückchen unten in die Ecke.
11) Now let’s quickly finish the inside. I kept a little piece of the embossed copper foil and glued that right into the corner on the inside. Again, the Vellum leaf is glued to the flower before adhering that to the inside of the card.
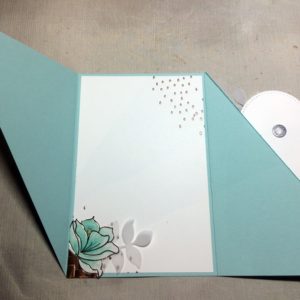
12) Vielleicht ist Dir beim letzten Bild das weiße Oval und der Magnet aufgefallen. Geschickt wie ich bin habe ich das passende Bild von vorne dazu gelöscht. Ahem… nun ja. Das weiße Oval ist die Rückseite vom Oval aus Schritt 10, auf dem die Kupferfolie und Blüte aufgeklebt ist. Schließe die Karte, lege das Oval auf und klebe nur da, wo das Oval auf dem Designerpapier unten rechts aufliegt, Dimensionals auf.
Du hast jetzt zwei Möglichkeiten:
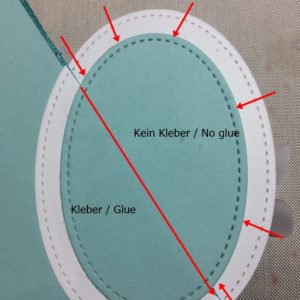
– die Karte hat einen Schiebeverschluß: ich habe innen ein Stück des zweiten weißen Ovals aufgeklebt, alles was über die Kartenkante ragt habe ich abgeschnitten. Das bildet dann einen gleichmäßigen Rahmen für das Oval aus Aquamarin-Farbkarton, das ebenfalls auf die Innenseite geklebt wird. Kleber kommt dabei nur auf den unteren Teil, der auf der Kartenklappe aufliegt! So entsteht zwischen dem weißen Oval außen und dem Aquamarin-Oval innen ein Zwischenraum, in den Du andere Seite der Karte einschieben kannst. Überall dort, wo auf dem Bild rote Pfeile sind, sind die Ovale nicht miteinander verklebt. Auf der Vorderseite kannst Du jetzt noch das gepunktete Dreieck aufkleben.
– die Karte hat einen Magnetverschluß: wenn Du kleine Magnete zur Hand hast, kannst Du einen jetzt auf die Rückseite des Ovals kleben wie man in Schritt 11 sieht. Schließe die Karte und klebe das Gegenstück auf die Vorderseite der linken Klappe. Dann klebst Du das gepunktete Dreieck auf, das den Magneten verdeckt. Das zweite weiße und das Aquamarin-Oval kannst Du so anbringen wie oben beschrieben, hier musst Du aber nicht darauf achten wo Kleber ist und wo nicht, da das Oval nur den Magneten verstecken soll.
12) Maybe you noticed the white oval and the little magnet in the last picture. I deleted the matching picture I took from the front – yay me! Well.. the oval is the back of the one from step 10, where you adhered the copper foil and flower to it. What you do is you close the card, lay the oval down where you want it and put dimensionals to the back of it, but only where it touches the DSP on the lower right flap!
Now you have two options:
– Sliding closure for the card: adhere a part of the second Whisper White oval to the inside so it is in the same position as the one on the outside. Cut off anything that goes over the edge of the card flap. This is a nice border for the Pool Party oval, that you can now adhere to the inside as well. Be careful to only glue down the lower part that lies over the card flap! This way, there is a gap between the white oval outside and the Pool Party one inside that allowes you to slide the other front flap between them to hold the card closed. If you take a look at the second picture, the red arrows show you where the ovals are not glued together. On the front, you can now adhere the dotted Pool Party triangle to the front flap.
– Magnet closure for the card: if you have small magnets at hand, put one to the back of the Whisper White oval as you could see in Step 11. Close the card and adhere the matching magnet to the front of the left flap. By putting the dottet Pool Party triangle over it the magnet is hidden. The second Whisper White oval and the Pool Party oval can be placed as I described above, the only difference is that you do not have to worry about where to put your adhesive as the ovals only have to cover the magnet.
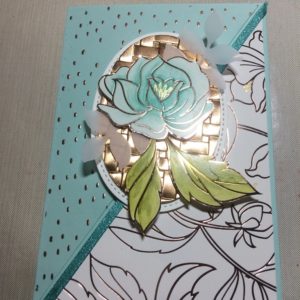
13) Puh… das Schwerste ist geschafft! Wusstest Du schon, dass man das Geschenkband in Kupfer auseinanderziehen kann? Das gibt einen schönen Netzeffekt, den ich hier als Hintergrund für das Wort „wunderbar“ genommen habe. Das Band habe ich mit Präzisionskleber festgeklebt, dann kommen die beiden ausgestanzten Worte mit leichtem Versatz darüber. Fertig!!
13) Phew… the hardest part is over! Did you know that you can pull apart the copper trim to form the wonderful net I used here as a background for the die cut word? Use the Fine-Tip Glue to adhere the trim to your card and also to glue your word down, offsetting the two layers slightly. That’s it, done!!
Product List

")
")
")


 Shimmer Ribbon Pack")


Hinterlasse einen Kommentar